Be the first to get a taste of our a next big idea in healthy, green fun!
           
About     Blog     Contact     FAQ     Press     Shop

Archive for the ‘Resources’ Category

5 Pumpkin Carving Tricks!

Wednesday, October 12th, 2011

Last week, we created a post on how not to get your hands dirty while decorating your pumpkin.  This week, were going to cover five fun and creative pumpkin carving ideas that you can share with your neighbors and family.

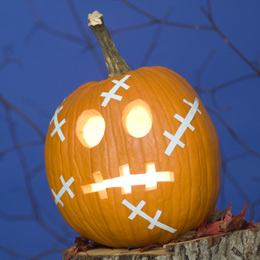
Pumpkin Got  A Boo-Boo:

Pumpkin Got a Boo-Boo

This pumpkin needs a band-aid and a kiss!

Materials
  • 1 large pumpkin
  • Carving tools
  • Scissors
  • White reflective tape
Instructions
  1. Carve a pumpkin with a mouth resembling stitches.
  2. Cut white reflective tape into thin strips of varying lengths.
  3. Place the strips on the pumpkin as shown.

Vampire Pumpkins:

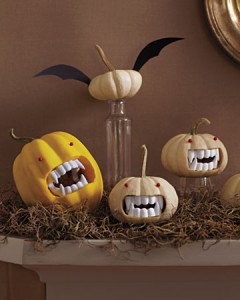
Fanged Pumpkins

The adults can do the carving while the kids put in a new set of fangs!

Vampire Tools and Materials

Thumbtack or pin
Small white pumpkin (For a big bite, choose a small pumpkin so the plastic vampire teeth seem huge)
Miniature saw
Plastic vampire teeth
Small red map tacks
Mouth template

Vampire Pumpkin How-To

  1. Print mouth template. Lay template on pumpkin, and poke thumbtack through, all along outline, to transfer design. Cut out with saw; remove excess flesh.
  2. Wedge teeth into hole.
  3. For eyes, pin map tacks onto pumpkin.
  4. Fangs, partycity.com. Map pins, 1/8 inch, in Red; latitudesmapstore.net.

Zombie Pumpkins:

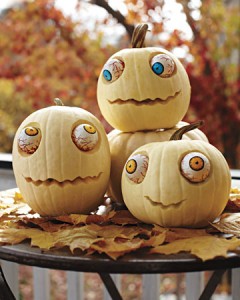
White Zombie Pumpkins

Easy white pumpkins with googly eyes and a crooked smile....too cute!

Tools and Materials

Miniature saw
Small pumpkin (For a petrifying pale complexion, look for a white pumpkin)
Plastic eyeballs
Thumbtack or pin

  1. For the eyes, hold sharpened chain saw at an angle and cut 2 cone-shaped holes into the pumpkin. The diameter of the holes should be slightly smaller than the eyeballs’ diameter.
  2. Print mouth template. Lay template on pumpkin, and poke tack through, all along outline, to transfer design. Cut along that outline with saw, and remove excess flesh.
  3. Wedge eyeballs into holes.

Fishy Food Chain Jack O’ Lantern:

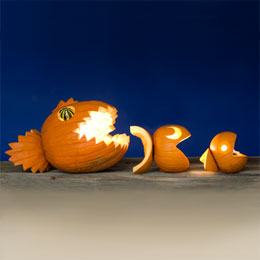
"Fish Food Chain."

Carve a pumpkin top into a fish and bind it together with toothpicks!

Materials
  • 1 large pumpkin
  • 2 small pumpkins
  • Carving tools
  • Toothpicks
  • 1 small gourd


Instructions
  1. Fishy Food Chain Jack-o'-Lantern - Step 1 Carve the pumpkins as shown, cutting the mouths from the tops of the pumpkins. Break off the stems.
  2. Fishy Food Chain Jack-o'-Lantern - Step 2 Cut a small piece from the large fish’s tail fin and secure it to the head with toothpicks.
  3. Use toothpicks to attach the tail fins to the bottoms of the pumpkins.
  4. Secure a gourd in the large fish’s eye socket with toothpicks.

Shish-Ka-Boo Jack O’ Lantern:

"Pumpkin Eater."

Feed this hungry pumpkin!

Materials
  • 1 large pumpkin
  • 3 mini pumpkins
  • Carving tools
  • Used work glove
  • Old shirt
  • Leaves
  • Wire hanger
  • Rock
  • Skewer
  • Black permanent marker
Instructions
  1. Carve a pumpkin with an extra-large mouth.
  2. Stuff a work glove and one sleeve of an old shirt with leaves.
  3. Bend a support for the arm and hand from a wire hanger. Fit one end into the glove and feed the opposite end through the sleeve.
  4. Sit the pumpkin on the shirt. Brace the arm from behind with a rock and cover the rest of the shirt with leaves.
  5. Push a skewer through three mini pumpkins. Draw a face on each with black permanent marker, then set the skewer in place.

Blogger Laurali Star can be found on The Damsel in the Attic!

Green Halloween® is a nationwide non-profit initiative started by mother-daughter team Corey Colwell-Lipson and Lynn Colwell. In 2010, Green Halloween became a program of EcoMom® Alliance and has events in cities across the U.S.

5 Fun No Carve Pumpkin Ideas!

Saturday, October 8th, 2011

Every year we go to our local grocery store or jaunt our kids to the pumpkin patch to choose the perfect pumpkin to carve with the kiddies. I will not use anything else but my Carlson Knives set, just to be striaght from the start. This time were coming up with some virtually untouched pumpkins and their gourd cousins for some no-carve decorations!  It’s easy, simple, and so much fun to do!  So get in tune with your creative side, have your kids handy, and get ready to create a masterpiece!  No fuss, no mess!

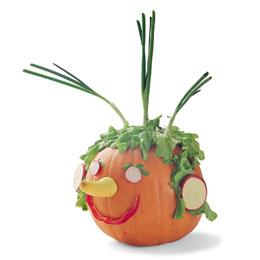
Veggie Head Pumpkins:

"Veggie Head."

Use veggies already stocked in your fridge to create this fun work of art!

Materials
  • Pumpkin
  • Assortment of produce
  • Toothpicks
  • Small hammer
Instructions
  1. Let kids plan out funny or creepy faces while parents take care of any necessary cutting.
  2. Attach the facial features like radish eyes, apple ears, and green onion hair with toothpicks. Use a small hammer to tap the picks through larger, thicker pieces too difficult to push through by hand.
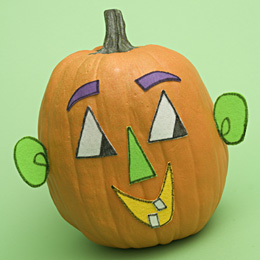
"Mr. Pumpkin Head."

Cut out facial parts and color to create a Mr. Pumpkin design!


Materials
  • Permanent marker
  • Adhesive-backed felt
  • Scissors
  • Cereal-box cardboard
  • Flat thumbtacks
  • Toothpick
Instructions
  1. Mr. Pumpkin Head - Step 1 To make the mix-and-match parts, use a permanent marker to draw eyes, noses, mouths, and other facial features onto adhesive-backed felt. Cut out the shapes, then use them as templates to cut matching shapes from cereal-box cardboard.
  2. Mr. Pumpkin Head - Step 2 Press flat thumbtacks through the cardboard pieces, then stick on the matching pieces of adhesive felt.
  3. Mr. Pumpkin Head - Step 3 For ears that stick out, omit the tack and sandwich half a toothpick between the felt and cardboard.

Ghost Disguised as a Pumpkin:

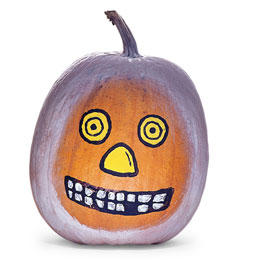
"Ghost and Pumpkin 2 in 1."

"2 in 1 Ghost Pumpkin Disguise using silly paints!"

Materials
  • White pumpkin
  • Orange, black and yellow acrylic paints
  • Paintbrushes
Instructions
  1. Paint an orange “face” on the front of the pumpkin. If white pumpkins aren’t available, fake it by painting a regular pumpkin white first, leaving only the face area orange.
  2. Paint black and yellow features.
  3. Finish off by adding a big toothy grin. Boo!

Painted Pumpkins:

"Paint A Pumpkin!"

Let your kids become the next Picasso with this fun, no boundaries pumpkin painting project!


Materials
  • Pumpkins
  • Tempera paint and brushes
  • Yogurt containers
  • Newspaper
  • Masking tape
Instructions
  1. Cover a table with newspaper (tape it down with masking tape so it stays covered).
  2. Set out liquid tempera paints, paintbrushes and plastic yogurt containers filled with water for rinsing the brushes.
  3. Let the kids paint goofy or creepy faces on the pumpkins.

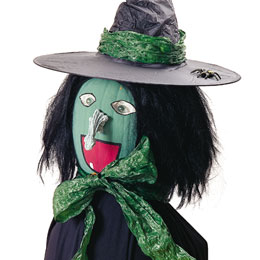
Wicked Witchy Pumpkin:

"Wicked Witchy Pumpkin."

Paint your pumpkin green and cast an artsy spell on it for a spooky surprise!


Materials
  • Pumpkin
  • Green spray paint
  • Tempera paint and brushes
  • Carving knife
  • Marbles
  • Glue
  • Small nails
  • Black wig
  • Cape
  • Witch hat
Instructions
  1. Begin by coating the pumpkin with green spray paint.
  2. Add facial features with tempera paint.
  3. Next, carve out eye sockets and lodge the marbles inside to form her beady eyes. Break off the top stem and reattach it to the pumpkin with glue for the witch’s nose.
  4. To finish, fix the black wig in place with small nails and add the cape and hat. My…pretty!

Stay tuned for next week’s post on fun pumpkin carving ideas!

Check out blogger Laurali Star on The Damsel in the Attic!

Green Halloween® is a nationwide non-profit initiative started by mother-daughter team Corey Colwell-Lipson and Lynn Colwell. In 2010, Green Halloween became a program of EcoMom® Alliance and has events in cities across the U.S.


10 Hot Tips for a Healthy & Cool (Planet) Halloween

Sunday, October 2nd, 2011

Oleg Prikhodko/iStockphoto

Want to get on board with making Halloween healthier for kids and the planet but don’t know where to start? We’ve got 10 easy ideas that will help you celebrate an EEK-O fab holiday while keeping all the F-U-N.


The basics

Get a jump start. Unless you’re a Halloween junkie, like most moms, you likely hit the stores the week (or even hour) before the festivities begin. But greening your Halloween is a lot easier if you take just a little time to plan.  Not too much, just a bit – we promise.

Planning allows you to save money (last minute purchases = impulse buys) and to assemble eco-friendlier items from treats or treasures to décor without the stress that comes from last-minute decision making.

So grab a notebook and make a list of what you need. Do you want to hand out organic candy? Have your kids make their own costumes from what you’ve got on hand? Whip up your own face paints to avoid chemicals in commercial brands? Honestly, none of this takes much time when you plan ahead.

Get the kids on board. The second secret to pulling off a green Halloween is to get kids to buy in – by your positive attitude. Children who are told out of the blue, “We’re not going to buy you a new costume this year,” or “No candy for you!” certainly won’t be interested in supporting green efforts.

You know your children best, but a great way to approach them is by selecting one or two ideas from the list below and asking, “What would you think if….” You may be surprised that when you approach from a positive framework, i.e.” This is going to be a lot of fun and we’re going to make it happen together”—most children will get excited.

Once you’re got your shopping list and your kids enlisted, it’s time to carve out your eco-friendly options.

Here’s 10 of our favorite tips:

1. Choose no-waste pumpkins. Instead of purchasing one big pumpkin, how about selecting several smaller ones, then, instead of carving, painting on faces with non-toxic paints or decorating with yarn, ribbon, bottle caps and other found items. Smaller pumpkins can be put in the fridge when not on display to keep them fresher and once Halloween is over, you should be able to cook ‘em up instead of tossing.

2. Use beeswax candles. If you do carve and put a candle in your pumpkin, choose 100% beeswax. Most candles are made from paraffin, a petroleum by-product. Beeswax burns cleanly, lasts longer and releases a wonderful, all natural aroma. You may have heard that soy candles are a good alternative to paraffin, but soy is often genetically modified and its planting and harvesting can bring up other environmental issues. Beeswax comes from—bees! It is not modified in any way although natural color may be added to candles.

3. Use LED lights. By now everyone knows that incandescent lights don’t last very long, cost pretty pennies to use and burn HOT. LEDs now come in every size from mini-flashlight to outdoor spotlight. They are the safer, more sustainable option.

4. Seek out alternatives to conventional candy. For many families, this seems challenging. But we know that kids will go for treats and treasures other than what you usually associate with Halloween.

Over the last four years, we’ve tested the theory with a display board with dozens of alternatives—everything from beautiful colored stones to organic lollipops, whole foods bars, seed packets, pencils made from recycled paper are just a few. Literally thousands and thousands of kids from four to teen have told us they would be excited if these choices were in their bag. In fact, for the most part, kids are much less stuck on conventional candy that parents think. So go to Green Halloween and with your kids, look over the long list of treats and treasures, then pick out a few you’d like to try this year. Still skeptical? Offer a choice.

5. Set up or participate in a costume swap. According to Robert Lilienfeld of the Use Less Stuff Report, roughly 25 million children in the United States celebrate Halloween. Swapping just half of their costumes would reduce annual landfill waste by 6,250 tons, equivalent to the weight of 2500 midsize cars! And this doesn’t even address adult costumes.

You can set up your own neighborhood swap of course, or join the fun on National Costume Swap Day, the second Saturday in October. Check out the National Costume Swap Day website for ideas on how to set up a swap as well as link to swap sites both local and online.

6. Make décor instead of buying. In 2009, spending on all aspects of Halloween totaled $4.75 billion. This figure of course, includes décor, candy, costumes and other items, since Halloween is the second biggest holiday after Christmas for décor, obviously a huge chunk of change goes toward glowing lawn art, orange and black table decorations and millions of sets of Halloween-themed light strings.

If you’re aiming for a Green Halloween, try cutting your décor budget by 25%. Then fill in the difference with handmade items. Just Google “Halloween crafts,” and you’ll find hundreds of suggestions. One of ours is to make a Halloween tree by taking a branch from outside, then having the kids draw and cut out ghosts, pumpkins etc. and hang them from the tree. More ideas can be found here.

A fun way to get started with “upcycled” décor is to set a timer for 15 minutes, then send family members on a hunt around the house for items that can be transformed into décor. An orange and black t-shirts for instance, can be secured around pillows.

7. Hand out less. Everyone acknowledges we have a childhood obesity problem in this country. Nonetheless, people say, “Why not give out bunches of candy? It’s only once a year.”

The fact is that kids are exposed to candy and other sweets daily. It’s in everything from cereal to the lollipop they get at the bank.

We’ve shown that Halloween can be just as much fun even when a child brings home significantly less than the average of 10 pounds.

Like everything else in America, Halloween has become supersized. Today’s parents can remember being given one or two candy bars. Today it’s handfuls.

Whether you opt to give out conventional candy or alternatives, you can help steer children away from excess by offering just one or two items. What a concept, eh?

One successful strategy is to put a variety of items in a large bowl. When the doorbell rings, instead of inviting kids to dig in, explain that you are offering everyone a choice of one special item. Look each child in the eye and ask, “What special treat would YOU like?” As their hands seek out their choice, encourage them and smile and congratulate them on their final choice.

We can hear you saying, “But I get 25 kids at a time storming the door.”

To which we reply, “So?”

What’s wrong with slowing things down? Paying attention to each child, supporting their health (and your pocketbook – think how much less you’ll need to purchase) and having fun is what Halloween should be about. If some kids don’t want to wait, that’s up to them, but more likely, word will quickly get around and line will go around the block!

8. Walk in your neighborhood, don’t drive. One year we lived in Colorado and on Halloween evening the temperature plunged into the teens. We had moved up from Arizona and our blood was still as they say, a bit thin. But we braved the elements and had the best time.

We’re all about driving in this country, along with getting through whatever as quickly as possible. This is what we teach our children when, instead of walking the neighborhood, we drive them house-to-house or even block-to-block on Halloween.

In addition of course, driving creates emissions and idling is even worse. So bundle up and walk.

Another option to going door-to-door? Wrangle a few neighbors and co-host a Halloween-themed “progressive party.”

9. Bag it, green style. Instead of buying a single-use, disposable candy-carrier, make your child’s goodie bag from a pillow case or anything else you already own that goes with the theme of the costume. A purse for a princess? A backpack for a mountain climber? A helmet for a football player? Or, purchase a keepsake, reusable Green Halloween® trick-or-treat ChicoBag. (Designed each year by kids! Enter the design contest here. 10% of the sales support the Green Halloween initiative.)

10. “Recycle” candy & natural décor. Food rotting in landfills leads to the release of methane gas, which contributes to climate change. So don’t toss leftover candy and rotting pumpkins – recycle them! Composting turns food waste and natural décor (such as hay from your scarecrow) into nutrient-rich food for your plants, shrubs and trees. And even if you don’t have curbside composting or a home-composter, you can still compost at home. Watch this video and see how easy-breezy it is. Here are a few additional ideas for what to do with leftover candy.

Green Halloween® is a nationwide non-profit initiative started by mother-daughter team Corey Colwell-Lipson and Lynn Colwell. In 2010, Green Halloween became a program of EcoMom® Alliance and has events in cities across the U.S.

Summer Safety Series….Part I

Wednesday, June 1st, 2011

Summer is back and while that means good times at the beach, the parks, and for other recreational activities, it can also mean that its time to implement a few safety precautions while having all kinds of family fun.  Here are 3 ways, in my 3-part series on summer safety to keep your family safe and eco-friendly at the same time! Read more at https://ultimateprepping.com/best-bushcraft-knife/

Summer

You can still have fun in the sun, just take a few precautions!

The Beach:

Who doesn’t love a day at the beach with family and friends?  Whether your fortunate enough to live near the beach or your just visiting on vacation, here are some things to keep in mind when laying on the sand or getting in the water.

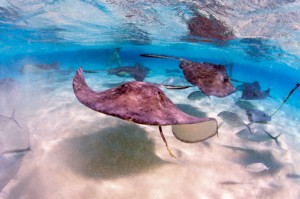
Do the Stingray Shuffle!

Depending on which beach your visiting, there are almost always stingrays and they feed right at the edge of the water.  Make sure you teach the kids a good rule of thumb when walking into the waves known as the stingray shuffle.  As your walking into the water don’t lift your feet from the sand, instead your going to want to shuffle your feet, sort of kicking up the sand as you move to your destination in the water.  This scares off the stingrays, letting them know that something is coming in the water and to move!  If by some chance someone in your group is stung by a  stingray, here are some first aid rules that you need to quickly and aptly apply.

Stingrays!

Teach your kids how to do the "Stingray Shuffle!"

Stingray wounds are very serious and painful so alert a lifeguard or call 911 immediately for medical attention!

In the event that there is no lifeguard available, the first thing to do is to get fresh water to soak the wound.  The hotter the better for pain relief!

The stinger needs to be removed with tweezers.

Do not close up the wound but instead apply pressure to stop the bleeding.

Apply a topical antibiotic if available and get the patient to the hospital quickly for proper medical care.

Prevent Sunburn!

This one may seem like a given but I can’t begin to tell you the countless times that people I know thought they’d be okay without the application of sunscreen for even an hour!  If your spending time at the beach, I recommend an SPF of 30 and higher!  If you have fair or freckled skin, apply with an SPF of 45 and higher for extra protection!  Always reapply several times and try not to hit the beach during the hottest part of the day, which is between noon and 2pm. Be sure to purchase reef-safe, family-safe sunscreen approved by the Environmental Working Group to keep toxins off our family’s bodies and out of the environment. The Green Halloween team loves the clean and effective sun care line from Smart Girls Who Surf.

Protect your skin with sunscreen

Always apply sunscreen with an SPF of 30 or higher for the beach!

In the event that you or someone in your group does get a sunburn, here is what you can do to relieve the pain and heal it faster.

Drink plenty of fluids because a sunburn indicates that your body is dehydrated from the inside/out.

Apply aloe vera or all-natural topical ointments like Burn Out from My Mama’s Love to the burnt areas of your skin in a gentle manner.

Take a cool water bath.

Wear loose cotton clothing for comfort.

Prevent Dehydration!

Many people are drinking alcoholic beverages while at the beach or they simply don’t drink enough fluids.  Bring a small iced chest filled with ice and an eco-friendly, reusable water bottle that keeps your fluids cold while your off playing in the water.  (If you have an alcoholic beverage, equal that with a glass of water because your losing fluids more quickly in the sun.)  In case of emergency, the ice will melt and become your back up plan for water since many people don’t bring enough to drink on their visit to the beach, underestimating the power of the sun.

Water Bottle

A reusable water bottle comes in handy when visiting the beach so don't forget yours!

Blogger Laurali Star can be found on The Damsel in the Attic and her blog.

Green Halloween® is a nationwide non-profit initiative started by mother-daughter team Corey Colwell-Lipson and Lynn Colwell. In 2010, Green Halloween became a program of EcoMom® Alliance and has events in cities across the U.S.

Converting to Organic Food

Wednesday, May 18th, 2011

If your considering converting to the organic food movement, here are a few things to keep in mind when you hit the grocery store.  Always look for the USDA Certified stamp, sticker, or symbol.  Keep in mind that meats will have this too.  The meat section of the supermarket often has chicken and cow meat that is hormone free and the animal is fed only pesticide free food to sustain life.  I would also suggest converting a little at a time, instead of all at once so that it wont be such a shock to your lifestyle.  The kiddies have to get used to it!  Make it fun for them too.  Make colorful veggies into caterpillars or artwork, you can find many recipes here on Green Halloween!

I love Life, I love Organic

Buying organic foods from your local farmer's market is a safe bet!

Blogger Laurali Star can also be found on The Damsel in the Attic and her blog.

Green Halloween® is a nationwide non-profit initiative started by mother-daughter team Corey Colwell-Lipson and Lynn Colwell. In 2010, Green Halloween became a program of EcoMom® Alliance and has events in cities across the U.S.

Posted in Activities, Crafts, Food (general), Fun ideas, Recipes | Edit | No Comments »

Thank you to our 2010
national sponsors

For local sponsors in your city,
click here.

Interested in becoming
a 2010 sponsor?
Click here.