Be the first to get a taste of our a next big idea in healthy, green fun!
           
About     Blog     Contact     FAQ     Press     Shop

Archive for the ‘Recipes’ Category

A Veggie Skeleton for Halloween

Monday, October 17th, 2011

At our daughter’s school each class has a Halloween party.  They pick four families to bring a “treat” and four families to bring something healthy!  Last year our family was asked to bring in a healthy treat for our daughter’s class party so we found this great and easy to make Vegetable Skeleton. I wasn’t sure how popular it would be up next to all the sweet treats but I was pleasantly surprised at the end of the day to see that the tray was pretty much empty…just 3 mushrooms left AND there were still plenty of cakes and cookies left uneaten!!!

Here is the picture my husband took of our veggie skeleton!


This is all it takes to make a veggie skeleton:

• Head of cabbage or iceberg lettuce
• Zucchini slices (rounds)
• Bell Pepper slices (cross-cut)
• Celery stalks
• Sugar snap peas
• Carrots (peeled)
• Broccoli florets
• Cauliflower florets
• Cherry/Grape Tomatoes
• Healthy dressing of your choice!
• Olive slices

Directions:

Step 1. Line half of small bowl with lettuce for the skeleton’s hair; fill with dressing. Place at one end of large tray or baking sheet for the skeleton’s head.

Step 2. Arrange vegetables on tray to resemble skeleton’s body

* We added the fake spiders for a little extra fun :)

Halloween parties can have a balance of sweets and health…by spending a little extra time you can make veggies just as fun as any junk food!

Happy Healthy Eating,
Kia

Kia Robertson is a mom and the creator of the Today I Ate A Rainbow kit; a tool that helps parents establish healthy habits by setting the goal of eating a rainbow of fruits and vegetables every day. Kia is passionate about creating tools that help parents raise healthy kids!

5 Pumpkin Carving Tricks!

Wednesday, October 12th, 2011

Last week, we created a post on how not to get your hands dirty while decorating your pumpkin.  This week, were going to cover five fun and creative pumpkin carving ideas that you can share with your neighbors and family.

Pumpkin Got  A Boo-Boo:

Pumpkin Got a Boo-Boo

This pumpkin needs a band-aid and a kiss!

Materials
  • 1 large pumpkin
  • Carving tools
  • Scissors
  • White reflective tape
Instructions
  1. Carve a pumpkin with a mouth resembling stitches.
  2. Cut white reflective tape into thin strips of varying lengths.
  3. Place the strips on the pumpkin as shown.

Vampire Pumpkins:

Fanged Pumpkins

The adults can do the carving while the kids put in a new set of fangs!

Vampire Tools and Materials

Thumbtack or pin
Small white pumpkin (For a big bite, choose a small pumpkin so the plastic vampire teeth seem huge)
Miniature saw
Plastic vampire teeth
Small red map tacks
Mouth template

Vampire Pumpkin How-To

  1. Print mouth template. Lay template on pumpkin, and poke thumbtack through, all along outline, to transfer design. Cut out with saw; remove excess flesh.
  2. Wedge teeth into hole.
  3. For eyes, pin map tacks onto pumpkin.
  4. Fangs, partycity.com. Map pins, 1/8 inch, in Red; latitudesmapstore.net.

Zombie Pumpkins:

White Zombie Pumpkins

Easy white pumpkins with googly eyes and a crooked smile....too cute!

Tools and Materials

Miniature saw
Small pumpkin (For a petrifying pale complexion, look for a white pumpkin)
Plastic eyeballs
Thumbtack or pin

  1. For the eyes, hold sharpened chain saw at an angle and cut 2 cone-shaped holes into the pumpkin. The diameter of the holes should be slightly smaller than the eyeballs’ diameter.
  2. Print mouth template. Lay template on pumpkin, and poke tack through, all along outline, to transfer design. Cut along that outline with saw, and remove excess flesh.
  3. Wedge eyeballs into holes.

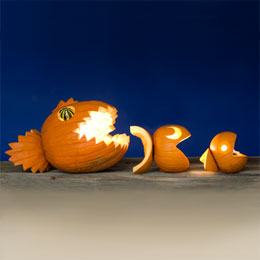
Fishy Food Chain Jack O’ Lantern:

"Fish Food Chain."

Carve a pumpkin top into a fish and bind it together with toothpicks!

Materials
  • 1 large pumpkin
  • 2 small pumpkins
  • Carving tools
  • Toothpicks
  • 1 small gourd


Instructions
  1. Fishy Food Chain Jack-o'-Lantern - Step 1 Carve the pumpkins as shown, cutting the mouths from the tops of the pumpkins. Break off the stems.
  2. Fishy Food Chain Jack-o'-Lantern - Step 2 Cut a small piece from the large fish’s tail fin and secure it to the head with toothpicks.
  3. Use toothpicks to attach the tail fins to the bottoms of the pumpkins.
  4. Secure a gourd in the large fish’s eye socket with toothpicks.

Shish-Ka-Boo Jack O’ Lantern:

"Pumpkin Eater."

Feed this hungry pumpkin!

Materials
  • 1 large pumpkin
  • 3 mini pumpkins
  • Carving tools
  • Used work glove
  • Old shirt
  • Leaves
  • Wire hanger
  • Rock
  • Skewer
  • Black permanent marker
Instructions
  1. Carve a pumpkin with an extra-large mouth.
  2. Stuff a work glove and one sleeve of an old shirt with leaves.
  3. Bend a support for the arm and hand from a wire hanger. Fit one end into the glove and feed the opposite end through the sleeve.
  4. Sit the pumpkin on the shirt. Brace the arm from behind with a rock and cover the rest of the shirt with leaves.
  5. Push a skewer through three mini pumpkins. Draw a face on each with black permanent marker, then set the skewer in place.

Blogger Laurali Star can be found on The Damsel in the Attic!

Green Halloween® is a nationwide non-profit initiative started by mother-daughter team Corey Colwell-Lipson and Lynn Colwell. In 2010, Green Halloween became a program of EcoMom® Alliance and has events in cities across the U.S.

5 Healthy Recipes Made From Pumpkin

Wednesday, October 5th, 2011

It doesn’t take long this time of year to get your taste buds roaring in expectancy of some of our favorite fall recipes!  Key ingredient:  Pumpkin, of course!  We did a little digging around and came up with 5 scrumptious recipes that we know both the adults and kiddies will adore.

"5 Recipes Made From Pumkin."

Pumpkin, packed with antioxidant beta carotene, is good for many fun recipes!

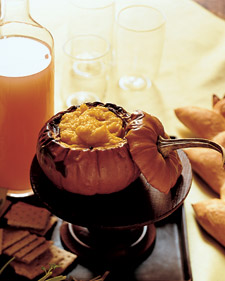
Pumpkin Dip:

  • Yield Makes about 4 cups
Add to Shopping List 

Ingredients

  • 3 sugar pumpkins, about 2 pounds each
  • 5 tablespoons olive oil, plus more for brushing pan
  • Coarse salt and freshly ground pepper
  • 3 sprigs rosemary
  • 3 garlic cloves, unpeeled
  • 1 tablespoon grated Parmesan cheese
  • Crudites, bread, and crackers, for serving

Directions

  1. Preheat oven to 425 degrees. Slice the tops off of the pumpkins. Remove the seeds, and discard. Drizzle the insides of the pumpkins with 1 tablespoon olive oil each. Season with salt and pepper. Place 1 sprig each of rosemary and 1 clove of garlic into the cavity of each pumpkin.
  2. Place the pumpkins in an oiled 11-by-13-inch pan, and bake in the oven until the skin is easily pierced with a knife, 30 to 40 minutes. Remove pumpkins from the oven, and allow to cool.
  3. Carefully remove the flesh from the pumpkins, reserving shell from most attractive pumpkin for serving. Squeeze roasted garlic from papery skins; place in the bowl of a food processor. Add pumpkin flesh; puree until smooth. If puree is watery or thin, place it in a fine-mesh sieve lined with damp cheesecloth, and allow liquid to drain for 20 to 30 minutes.
  4. Add the grated Parmesan and remaining 2 tablespoons olive oil to the pumpkin mixture. Stir to combine. Adjust seasoning with salt and pepper if necessary. Serve at room temperature in pumpkin shell with crudites, bread, and crackers.
"Pumpkin Dip."

Martha Stewart Pumkin Dip in a pretty little carved out pumpkin!

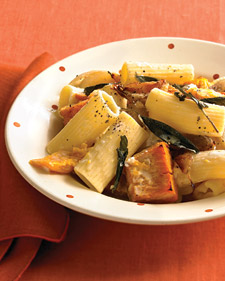
Rigatoni with Roasted Pumpkin and Goat Cheese:

  • Prep Time 15 minutes
  • Total Time 1 hour
  • Yield Serves 4
Add to Shopping List 

Ingredients

Directions

  1. In a large pot of boiling salted water, cook pasta until al dente. Reserve 1/2 cup pasta water; drain pasta, and return to pot. Add butter, cheese, and pasta water; toss until butter has melted.
  2. Gently fold in roasted pumpkin; season with salt and pepper. Divide among serving bowls, and serve immediately.
"Rigatoni With Roasted Pumpkin and Goat Cheese."

Pumpkin can make for a great comfort food in a pasta dish

Roasted Pumpkin with Shallots and Sage:

  • Prep Time 10 minutes
  • Total Time 45 minutes
  • Yield Serves 4
Add to Shopping List 

Ingredients

  • 1 medium sugar pumpkin (about 4 pounds), peeled, seeded, and cut into 2-inch chunks
  • 4 shallots, peeled and quartered lengthwise
  • 3 tablespoons olive oil
  • 1/4 cup fresh sage leaves
  • Coarse salt and ground pepper

Directions

  1. Preheat oven to 450 degrees. Divide pumpkin, shallots, oil, and sage between two large rimmed baking sheets; season with salt and pepper, and toss.
  2. Roast until pumpkin is tender, 30 to 35 minutes, tossing once and rotating sheets halfway through.
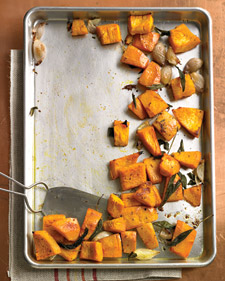
"Roasted Pumpkin with Shallots and Sage."

This crunchy, tasty side dish can be prepared for the rigatoni or eaten all on its own. Yum!

Pumpkin and Pecorino Gratin:

  • Prep Time 15 minutes
  • Total Time 45 minutes
  • Yield Serves 4
Add to Shopping List 

Ingredients

  • 2 slices white sandwich bread
  • 1/4 cup grated Pecorino Romano cheese
  • Coarse salt and ground pepper
  • 3 cups Sugar-Pumpkin Puree
  • 2 tablespoons butter, cut into small pieces

Directions

  1. Preheat oven to 450 degrees. In a food processor, combine bread and cheese. Season with salt and pepper, and pulse until large crumbs form.
  2. Season sugar-pumpkin puree with salt and pepper; spoon into a 1-quart baking dish. Sprinkle with crumb mixture, and dot with butter. Bake until crumbs are browned, 15 to 20 minutes.
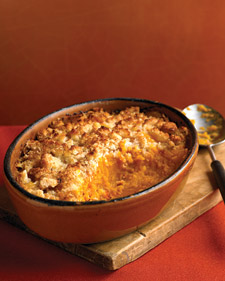
"Pumpkin and Pecorino Gratin."

Pumpkin and Pecorino Gratin makes a delicious casserole

Maple Roasted Pumpkin Salad:

  • Prep Time 25 minutes
  • Total Time 1 hour 15 minutes
  • Yield Serves 4
Add to Shopping List 

Ingredients

  • 1/4 cup pepitas (hulled pumpkin seeds)
  • 1 sugar pumpkin (3 1/2 to 4 pounds) peeled, seeded, and cut in 1 1/2-inch chunks
  • 5 tablespoons olive oil
  • 6 garlic cloves, unpeeled
  • 1/4 to 1/2 teaspoon red pepper flakes
  • Coarse salt and black pepper
  • 2 tablespoons plus 1 teaspoon pure maple syrup
  • 3 tablespoons fresh lime juice
  • 1 tablespoon Dijon mustard
  • 1 1/2 pounds arugula (2 to 3 bunches, thick stems removed), washed and dried
  • 6 ounces feta cheese

Directions

  1. Preheat oven to 450 degrees. Spread pepitas on a large rimmed baking sheet; toast in oven, tossing occasionally, until fragrant and beginning to brown, 5 to 7 minutes. Set aside.
  2. On a large, rimmed baking sheet, toss pumpkin with 2 tablespoons oil, garlic, red pepper, salt, and black pepper. Roast, tossing occasionally, until pumpkin is tender, 25 to 30 minutes.
  3. Remove garlic cloves from sheet pan; set aside. Drizzle pumpkin with 2 tablespoons maple syrup; toss to coat. Return to oven and continue roasting, tossing occasionally, until pumpkin is glazed, 5 to 10 minutes more; let cool.
  4. Meanwhile, cut off root ends of garlic cloves; squeeze out garlic and mash to a paste with the side of a knife. Transfer to a large bowl. Add lime juice, mustard, and remaining maple syrup; season with salt and pepper. Whisking constantly, add remaining oil in a steady stream; set aside.
  5. Add arugula and pumpkin and toss to combine. Serve salad sprinkled with toasted pepitas and crumbled feta cheese.
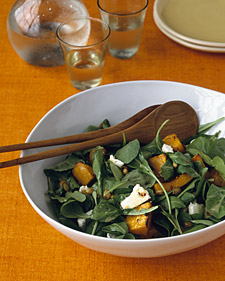
"Maple Roasted Pumpkin Salad."

Fill up on this sweet arugula salad before eating dinner to slim down!

Now get ready to hit the pumpkin patch for some great eats!

Blogger Laurali Star can also be found on The Damsel in the Attic!

Green Halloween® is a nationwide non-profit initiative started by mother-daughter team Corey Colwell-Lipson and Lynn Colwell. In 2010, Green Halloween became a program of EcoMom® Alliance and has events in cities across the U.S.

Healthy Milkshakes to Make With the Kiddies

Friday, September 16th, 2011
Homemade Milkshakes

Homemade milkshakes can be both a healthy and a tasty treat!

Here are three milkshakes that you can make at home that have all the flavor of a robust treat without all the calories and fuss!  I chose three that are not as commonly heard of but still pack a healthy punch.  It will also help introduce your family to some new fruits to place high up on the try it list, giving them a more worldly view of organic foods.

California Date Shakes: I had the pleasure of growing up in the Mojave Desert in Southern California as a kid, so this one brings back memories of long drives, date palms, the Indio Date Festival, and the serenity of the desert.  So for this one, set out some cacti and place pitted dates in an individual bowl.  Your going to need about a cup per individual milk shake.  Dates are one of the sweetest fruits and are found to be in high in dietary fiber, which aids in digestion and cholesterol levels.  They also come from a group of antioxidants known as tannins.  They are anti-infective, anti-inflammatory, and anti-hemorrhagic as well as plum full of beta carotene!

How to do this?

  • Take one cup of dates finely chopped and match it with one cup of frozen french vanilla yogurt and 1/2 cup of skim milk.  This helps reduce the calories.
  • Place both equal parts into the blender and add a little ground nutmeg and put blender on the milkshake setting.
  • You can opt to add other ingredients such as nuts but it depends on your family and their food allergy history.
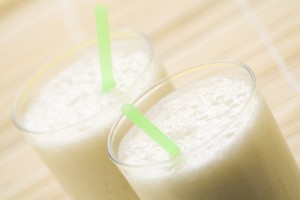
"Healthy Milkshakes!"

Who says making milkshakes can't be fun! Use props to set the scene, such as a cactus for a date shake.


Fresh Fruit With Caramel Drizzle Shake: This one is even easier than the last!  Visit your local grocery store for a few frozen ingredients.  I like Cascadian Farm strawberries and organic bananas.  Also, pick up a tub of frozen vanilla yogurt. Buy the little cubes of caramel from the candy section. Strawberries are a great source of fiber and vitamin A and C, as well as B6!  Bananas are brimming with potassium and are key to helping with belly bloat.  Good to Know!

How to do this?

  • Create a mini fondue section on the counter so kids and parents can dip fresh pieces of fruit in melted caramel.  Yum!
  • Cut up the strawberries and bananas and add to the blender, along with an equal cup of frozen vanilla yogurt and a half cup of skim milk.  Push the milkshake button and blend.
  • When shakes are done drizzle hot caramel over the top for melty goodness on extreme cold.  Enjoy!
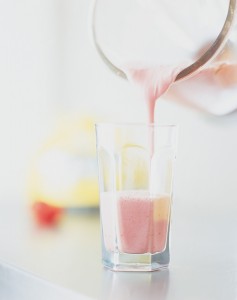
"Organic and Healthy Milkshakes."

Make a Family Gathering Special by Letting Kids Help in the Kitchen!

Pumpkin Pie Milkshakes:  With Halloween just around the corner I thought I should add one for the glorious autumn season!  This one takes a few more ingredients than the other two but is still user-friendly and simple.  Set the stage with some pumpkins and gourds, a cinnamon broom, and some pinecones for this delicious treat.  You just need graham crackers,1/3 pureed pumpkin, 2 teaspoons organic brown sugar, nutmeg, 1/2 cup of milk, cinnamon, and a cup of frozen vanilla yogurt!  Awe, what can we say about pumpkins?  The bright orange color of the pumpkin means its teeming with beta-carotene, which converts to Vitamin A in the body.  It also helps reduce the risks of cancer and the signs of aging.  Talk about incentive!

How to do this?

  • Add everything into the blender, let the kiddies stir!  Save the frozen yogurt for last so that you get a certain mushy consistency.  Add the nutmeg and the graham crackers to the top of the shake and serve chilled.

Try these out and let me know what you think!  We’d also love to hear about some of your own food bonding stories and ideas!  Happy Milkshakes!

Blogger Laurali Star can be found on The Damsel in the Attic and her new blog.

Green Halloween® is a nationwide non-profit initiative started by mother-daughter team Corey Colwell-Lipson and Lynn Colwell. In 2010, Green Halloween became a program of EcoMom® Alliance and has events in cities across the U.S.

Eco-Friendly Memorial Day Picnic

Wednesday, May 25th, 2011
Happy Memorial Day

It's a day to remember and a day to appreciate Earth and our families

Memorial day is the turning point in the season when you realize that summer is finally here.  It’s a time of year when families gather for backyard barbeques and fun water sports of all kinds.  While your making memories with family and friends, here are a few ways to do it with eco-friendly style!

Use a solar powered or gas grill instead of charcoal!

Recycle or compost all of the materials that use for your meal.

If your spending the day at the beach, have the kids do a fun beach clean up!  You’ll be surprised at the level of participation.

Aim for bio-degradable dishes for your picnic

Kick summer off right and stay tuned for safe summer practices!

Blogger Laurali Star can be found on The Damsel in the Attic and her blog.

Green Halloween® is a nationwide non-profit initiative started by mother-daughter team Corey Colwell-Lipson and Lynn Colwell. In 2010, Green Halloween became a program of EcoMom® Alliance and has events in cities across the U.S.