Be the first to get a taste of our a next big idea in healthy, green fun!
           
About     Blog     Contact     FAQ     Press     Shop

Posts Tagged ‘Celebrate Green’

“Scary” Food & Treat Ideas

Wednesday, October 26th, 2011
"Kids Halloween Party."

Trick or treat? Both! With scary foods and treats galore.

Have an up-coming Halloween party and don’t know what to make to feed your guests?  No worries!  Here are five scary foods and treats that are sure to monster rock the house down!

Scary Pear Heads:

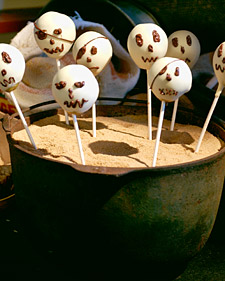
"Ghost Lollipops."

Using Pears as your main ingredient makes for a fun and spooky treat!

Ingredients

  • 8 firm ripe Seckel pears
  • 1/2 pound organic white chocolate, coarsely chopped
  • 1 ounce semisweet organic chocolate, coarsely chopped

Directions

  1. Remove the stem from the pears. Using a wooden skewer, make a hole in the stem end of each pear. Insert a lollipop stick in each hole.
  2. In a double boiler or a heatproof bowl set over a pan of simmering water, melt white chocolate. Let stand until cool. Dip the pears in the chocolate, turning to coat. Stand the pears up in a piece of foam or oasis. Let stand until set, about 40 minutes.
  3. In a heatproof bowl set over a pan of simmering water, melt the semisweet chocolate. Let cool for 5 minutes. Fit a small pastry bag with a #4 tip, and fill with melted semisweet chocolate. Pipe chocolate onto pears to create facial features. Let stand until set, about 10 minute

Be sure to use chocolate with Fair Trade on the label!  For more fun recipes like this, check out Martha Stewart online!

Swamp Juice:

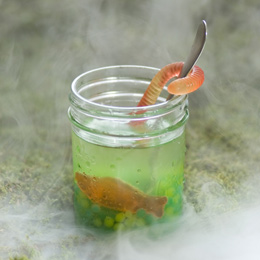
"Swamp Juice."

This spooky drink will creep out any party goer...in a delicious way!

Ingredients
  • FOR 8 SERVINGS:
  • 1/2 cup small tapioca pearls (found in the baking aisle of most grocery stores)
  • 100% natural food coloring
  • 4 tablespoons organic sugar
Instructions
  1. MAKE THE EGGS: Bring 6 cups of water to a boil and add the tapioca pearls. Reduce the heat slightly and boil the pearls, stirring occasionally, for 20 to 25 minutes.
  2. COLOR THE EGGS: Divide the pearls, with the remaining water, between two bowls. Add 4 drops of food coloring (we used 3 drops of yellow and 1 drop of green in one bowl, and 4 drops of blue in the other) and 2 tablespoons of sugar to each bowl. Stir the mixtures, then allow them to sit uncovered for 20 to 25 minutes. Drain and rinse the pearls with cold water.
  3. ASSEMBLE THE DRINK: Spoon 2 tablespoons of pearls into each glass and drop in a gummy fish. Fill the glasses with seltzer water, then add a splash of lemonade. Place a gummy worm around a spoon as shown.

Be sure to get use one of our fun sponsors for your gummy candy at Surf Sweets!  For more fun Halloween recipes similar to this one, check out Disney Family Fun!

Pizza Mummies:

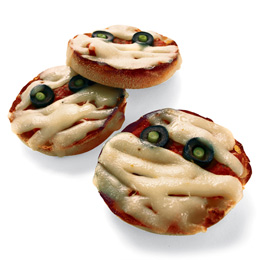
"Pizza Mummies."

Little mummies for mommy and her little kids too!


Ingredients (choose organic whenever possible)
  • English muffins
  • Pizza sauce
  • Black olives
  • Scallions
  • Red or green pepper
  • Cheese sticks or slices
Instructions
  1. Heat the oven to 350º F. For each mummy, spread a tablespoon of pizza sauce onto half of an English muffin (toast it first, if you like).
  2. Set olive slices in place for eyes and add round slices of green onion or bits of red or green pepper for pupils.
  3. Lay strips of cheese (we used a pulled-apart cheese stick) across the muffin for the mummy?s wrappings.
  4. Bake for about 10 minutes or until the cheese is melted and the muffin is toasty.

Be sure to use English Muffins that are whole grain and gluten free!

For more fun Halloween recipes similar to this one, check out Disney Family Fun!

Swamp Creatures:

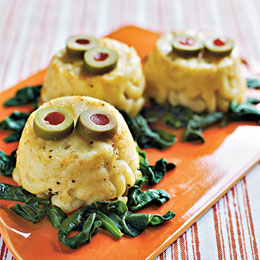
"Swamp Creatures."

Oooooey, Goooey Swamp Creatures that taste good!


Ingredients
  • All natural/organic Macaroni and cheese
  • Sautéed spinach
  • Olive slices
Instructions
  1. Mix up a batch of macaroni and cheese, then spoon it into greased muffin cups and bake until firm, about 25 minutes.
  2. Let the creatures rest for about 10 minutes, then gently remove them from the tins. Place them upside down on a swamp of sautéed spinach and add olive slice eyes.

Be sure to use whole grain, gluten free pasta for the macaroni!

For more fun Halloween recipes similar to this one, check out Disney Family Fun!

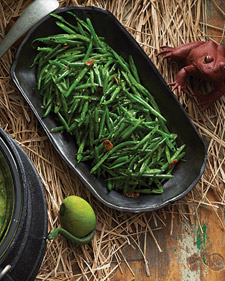
Slivered Scream Beans:

"Slivered Scream Beans."

Healthy and Scary at the same time!


Ingredients

  • 1 pound haricots verts
  • 2 tablespoons extra-virgin olive oil
  • 3 garlic cloves, thinly sliced
  • 1 tablespoon finely chopped peeled fresh ginger
  • 1/2 Thai chile, thinly sliced
  • Coarse salt
  • 1 1/2 teaspoons black sesame seeds (kalustyans.com)
  • 1 teaspoon finely grated lemon zest

Directions

  1. Prepare an ice bath. Bring a 4-quart pot of lightly salted water to a rolling boil. Add haricots verts, and blanch until vibrant green, about 5 minutes. Drain in a colander, and transfer to ice bath. Let stand until cool. Drain in colander, and thinly slice haricots verts on the bias.
  2. Heat oil over medium-high heat in a large skillet. Add garlic, and cook until just golden, 1 minute. Add ginger and chile, and cook for 1 minute more. Add blanched haricots verts, and cook, tossing, until heated through. Season with salt. Add sesame seeds and lemon zest, and toss to combine.

For more fun recipes like this, check out Martha Stewart online!

Blogger Laurali Star can also be found on The Damsel in the Attic!

Green Halloween® is a nationwide non-profit initiative started by mother-daughter team Corey Colwell-Lipson and Lynn Colwell. In 2010, Green Halloween became a program of EcoMom® Alliance and has events in cities across the U.S.


31 Days of {Green!} Giveaways: Day#22

Saturday, October 22nd, 2011

Welcome to Day #22 of our

31 days of {Green!} Giveaways

Today’s question: What’s your favorite Halloween joke?

*Attention Facebook fans: Please answer as a comment on our blog, not our Facebook page in order to be entered to win!*

Today is day #22 of our month-long, trick-or-treating party for parents!

Just knock on our door (AKA blog) each day, answer the daily question (in lieu of shouting, “Trick or treat!” – although you are totally welcome to write that as well) and you’ll be entered to win some absolutely fabulous, ever-so-eco-friendly prizes.

Today’s prize package is worth $50!

Celebrate Green

Copy of the book, “Celebrate Green! Creating Eco-Savvy Holidays, Celebrations & Traditions for the Whole Family; $24.95  Open to Continental US only via Media Mail

EcoMom
$15 EcoMom gift certificates via email (Can be used at the EcoMom Green Halloween store or for anything on EcoMom) Open to Canada and the US. Winner pays shipping.

Revolution Foods
Revolution Foods™ Organic Snack Packs! Reusable paper lunchbox for kids filled with samples of Grammy Sammys, Jammy Sammys, Mashups and Yo’ Drops, Tattoos and stickers for kids, and coupons for mom. $8-10  Continental US only


Here’s how to enter:

1. Add your e-mail address to the comment login, below. (We cannot notify you if we don’t have your e-mail address!)

2. Add a comment (one per e-mail address) with your answer to the question above.

3. Comment must post before 11:59pm PST – TONIGHT

Be sure to review our giveaway rules here. Please note shipping limitations.

Be sure to subscribe to our blog and follow us on Facebook & Twitter for daily reminders & updates for the 31 Days of {Green} Giveaways promotion.

Good luck & have FUN!

(& See you tomorrow )

Green Halloween® is a nationwide non-profit initiative started by mother-daughter team Corey Colwell-Lipson and Lynn Colwell. In 2010, Green Halloween became a program of EcoMom® Alliance and has events in cities across the U.S.


The Girls of Trash Mash Up!

Friday, October 21st, 2011

Meet the girls of Trash Mash-Up!  Bridget and Jessica McCracken are the brains behind this eco-friendly operation.  They reduce waste by taking refuse and transforming it into art and they love working with the community hands-on by creating theatrical productions that are based in the San Francisco area.  I had the opportunity to ask them a few questions recently and here is what they had to say about Trash Mash-Up, working together, and how they celebrate a Green Halloween every year!

How did the Trash Mash-Up idea and name come to be?

Both Jessie and I have been interested in theater and puppets since we were kids growing up in Michigan.  Our parents have always supported our creativity and encouraged us to give back to our community.  When Jessie moved to San Francisco in 2004 (I had been here since 2001), we wanted to establish a community based art project that built creative connections in neighborhood of need.  We saw a need for public space and parks to be fostered for children and families in the Western Addition.  Jessie and I both wanted to work with trash to discuss issues of consumption and environmental justice but in a way that was fun, creative and not didactic.  Trash Mash-Up brings all of these aspects together in a collaborative community art project.


"tmu_2 photo by Michelle Gutierrez."

The McCracken sisters: Bridget and Jesse


How do you like working together?

It is amazing to collaborate with my sister.  TMU is a family affair.  Our youngest sister, Kate and our parents, Bill and Louise are on our advisory board.  But it is Jessie and myself who are the teaching artists and Managing and Artistic Directors.  Being sisters we are able to communicate ideas easily and come for a similar art background, both having studied and worked for The Dell’Arte Company.  Although we share similar training, we each bring our own style and ideas to the table.

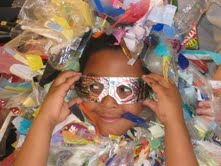
"Little Girl With Theatrical Mask."

This little girl is all dressed up and ready for the show!


What is your favorite aspect of the business?

My favorite aspect is leading the workshops.  Theater and art improves students’ self-confidence, communication skills and builds empathy for others.  They transform the learning process. It is amazing the dramatic changes and positive effects of students collaborating in creative ways.  I am always surprised by their solutions and their ability to describe their process.

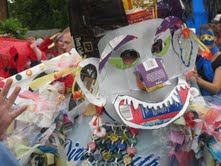
tmu_3 photo by Bridget McCracken

Recycle and Reuse seems to be the Trash Mash Up theme and we love seeing it turn into art!

What is Your future vision of the Trash Mash-Up idea?

We are hoping to bring Trash Mash-Up to communities across the United States and world.  We are working on revising our study guide in order to better assist the spread of creative reuse.  TMU has had the opportunity to mash it up in Costa Rica, New York, Portland, and even our hometown of Mt. Pleasant, Michigan.  Jessie and I look forward to additional community partnerships from around the world.

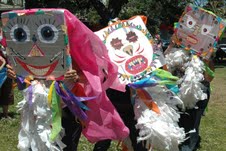
"tmu_4 photo by Ashanta My'ea Riley-Person."

Great costumes made from recycled materials to put on a show for diverse communities in the San Francisco area.

How do you plan on celebrating a Green Halloween this year?

Trash Mash-Up is thrilled to be apart of the Yerba Buena Garden Festival’s Halloween Hoopla : Dance & Parade for Kids. This is the 11th annual YBGF Halloween program and will featuring interactive performances and games for kids. The Unique Derique hosts, The Venezuelan Music Project plays live music, Preston folds origami and Trash Mash-Up will be creating masks, eco-warrior medallions, noise makers and a Trash Monster for the costume parade. Just before the hoopla ends, children under ten accompanied by adults are invited to parade in their Halloween finery!

"tmu_5 photo by Bridget McCracken."

Empowering the community through the arts!

Get in on the fun of Trash Mash-Up!  Here are the best ways to contact Bridget and Jesse:

Email: trashmashup@gmail.com

Website: http://www.trashmashup.org

Facebook: http://www.facebook.com/trashmashup

Twitter:  http://twitter.com/TrashMashUp

Flickr: http://www.flickr.com/photos/trashmashup/

MySpace: http://www.myspace.com/trashmashup

blog:  hhttp://trashmashup.wordpress.com/whats-happening/


Laurali Star can be found on The Damsel in the Attic!

Green Halloween® is a nationwide non-profit initiative started by mother-daughter team Corey Colwell-Lipson and Lynn Colwell. In 2010, Green Halloween became a program of EcoMom® Alliance and has events in cities across the U.S.

How to Make Your Own Bewitching Broom!

Wednesday, October 19th, 2011
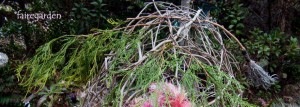
"Fairy Broom."

How to Make a Fairy Broom

Feeling crafty?  Gather the troops together to create your very own witches broom decoration for your home or porch!  Who knows, maybe there’s a little magic in the broom after all (wink, wink).

The how-to’s:

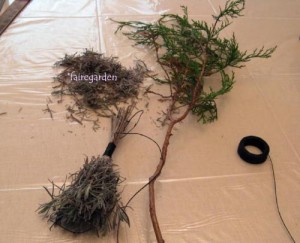
"Sticks and Twigs."

More than just your ordinary sticks and twigs create this magic broom!

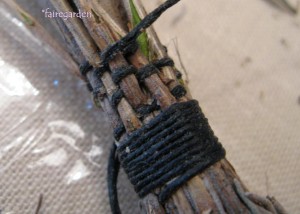
"Fairy Broom Weaving."

Choose your sticks wisely then bind together with waxed linen over and over.

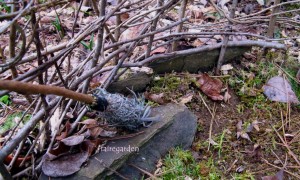
"Lavender Broom."

Lavender at the head of the broom adds the finishing touch!


For more about brooms, please check out Fairegarden!

Check out blogger Laurali Star at The Damsel in the Attic!


Green Halloween® is a nationwide non-profit initiative started by mother-daughter team Corey Colwell-Lipson and Lynn Colwell. In 2010, Green Halloween became a program of EcoMom® Alliance and has events in cities across the U.S.

5 Pumpkin Carving Tricks!

Wednesday, October 12th, 2011

Last week, we created a post on how not to get your hands dirty while decorating your pumpkin.  This week, were going to cover five fun and creative pumpkin carving ideas that you can share with your neighbors and family.

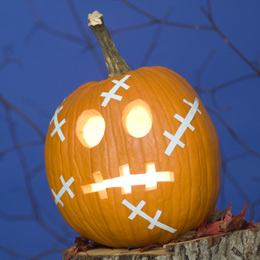
Pumpkin Got  A Boo-Boo:

Pumpkin Got a Boo-Boo

This pumpkin needs a band-aid and a kiss!

Materials
  • 1 large pumpkin
  • Carving tools
  • Scissors
  • White reflective tape
Instructions
  1. Carve a pumpkin with a mouth resembling stitches.
  2. Cut white reflective tape into thin strips of varying lengths.
  3. Place the strips on the pumpkin as shown.

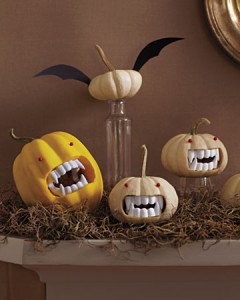
Vampire Pumpkins:

Fanged Pumpkins

The adults can do the carving while the kids put in a new set of fangs!

Vampire Tools and Materials

Thumbtack or pin
Small white pumpkin (For a big bite, choose a small pumpkin so the plastic vampire teeth seem huge)
Miniature saw
Plastic vampire teeth
Small red map tacks
Mouth template

Vampire Pumpkin How-To

  1. Print mouth template. Lay template on pumpkin, and poke thumbtack through, all along outline, to transfer design. Cut out with saw; remove excess flesh.
  2. Wedge teeth into hole.
  3. For eyes, pin map tacks onto pumpkin.
  4. Fangs, partycity.com. Map pins, 1/8 inch, in Red; latitudesmapstore.net.

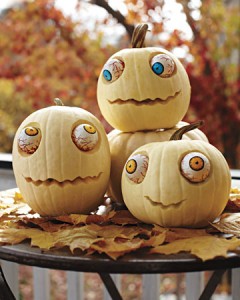
Zombie Pumpkins:

White Zombie Pumpkins

Easy white pumpkins with googly eyes and a crooked smile....too cute!

Tools and Materials

Miniature saw
Small pumpkin (For a petrifying pale complexion, look for a white pumpkin)
Plastic eyeballs
Thumbtack or pin

  1. For the eyes, hold sharpened chain saw at an angle and cut 2 cone-shaped holes into the pumpkin. The diameter of the holes should be slightly smaller than the eyeballs’ diameter.
  2. Print mouth template. Lay template on pumpkin, and poke tack through, all along outline, to transfer design. Cut along that outline with saw, and remove excess flesh.
  3. Wedge eyeballs into holes.

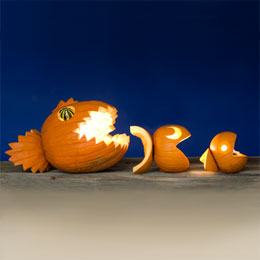
Fishy Food Chain Jack O’ Lantern:

"Fish Food Chain."

Carve a pumpkin top into a fish and bind it together with toothpicks!

Materials
  • 1 large pumpkin
  • 2 small pumpkins
  • Carving tools
  • Toothpicks
  • 1 small gourd


Instructions
  1. Fishy Food Chain Jack-o'-Lantern - Step 1 Carve the pumpkins as shown, cutting the mouths from the tops of the pumpkins. Break off the stems.
  2. Fishy Food Chain Jack-o'-Lantern - Step 2 Cut a small piece from the large fish’s tail fin and secure it to the head with toothpicks.
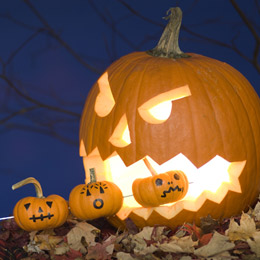
  3. Use toothpicks to attach the tail fins to the bottoms of the pumpkins.
  4. Secure a gourd in the large fish’s eye socket with toothpicks.

Shish-Ka-Boo Jack O’ Lantern:

"Pumpkin Eater."

Feed this hungry pumpkin!

Materials
  • 1 large pumpkin
  • 3 mini pumpkins
  • Carving tools
  • Used work glove
  • Old shirt
  • Leaves
  • Wire hanger
  • Rock
  • Skewer
  • Black permanent marker
Instructions
  1. Carve a pumpkin with an extra-large mouth.
  2. Stuff a work glove and one sleeve of an old shirt with leaves.
  3. Bend a support for the arm and hand from a wire hanger. Fit one end into the glove and feed the opposite end through the sleeve.
  4. Sit the pumpkin on the shirt. Brace the arm from behind with a rock and cover the rest of the shirt with leaves.
  5. Push a skewer through three mini pumpkins. Draw a face on each with black permanent marker, then set the skewer in place.

Blogger Laurali Star can be found on The Damsel in the Attic!

Green Halloween® is a nationwide non-profit initiative started by mother-daughter team Corey Colwell-Lipson and Lynn Colwell. In 2010, Green Halloween became a program of EcoMom® Alliance and has events in cities across the U.S.