Be the first to get a taste of our a next big idea in healthy, green fun!
           
About     Blog     Contact     FAQ     Press     Shop

Archive for the ‘Activities’ Category

Last minute Halloween Craft: Spider Web!

Friday, October 29th, 2010

Guest Post by Vanessa Valencia. Her blog is located at www.aFancifulTwist.Com and her website is located at Www.VanessaValencia.Com.

I think we should do something extra delightful today, don’t you?  I have so much fun cutting paper, and figuring out my own easier (to me) ways of doing things, that I decided to share.

So, I have 2 paper spider web techniques for you today…


I have been working on this post for a couple of days, and I hope you enjoy making these as much as I do….

To start, all you need is regular white printer paper, and scissors.

You can get fancy with spray paint and glitter a little later.  But for now, grab a piece of printer paper, and some scissors.

I like printer paper because it makes it easy to cut through the layers.  And, a coat of spray paint makes them a bit sturdy.

(I have moss and green metallic paint on my thumb in the spirit of swamp creatures, just for this spooky post)

I am going to share 2 techniques.

A simple and easy spider web technique…

And, a trickier way to use the “snowflake-paper-flower-urchin” method I showed you last year (see here), by spookifying it a bit.

Let’s begin with a simple paper spider web.

First, take a sheet of printer paper, and fold it in half, with the open side facing up.

Once you have folded it in half, fold it in half again, but only crease it at the bottom.

Next, fold the bottom right hand side up, so that you create a “V” point at your center mark.

Now, take your left side of paper, and fold it towards the back, lining up the edges.

Your paper should now make a “V” shape with a funny top.

We want to cut off the funny top.

So, make a horizontal line across your paper about here…

Now, cut the funny top of the paper off, to create a true “V”…

And now, you have a true “V” shape.

The next thing we will do is fold our ”V” in half.

Doing this will create a folded side, and an open side…

Face the open side to the right, and the closed/folded side to the left.

Next, we shall begin defining where we will make our cuts.

Take a pen or pencil and draw a line that starts in the upper right hand corner, and swoops down to the left.

This is the cut that will create the outer spider web shape.

Cut that piece off…

The next thing you will do is draw 4 long rectangles from the right side, to the left.  However, you must not cut into the left folded side, as it holds everything together.  So, make sure your rectangle ends a little before the left hand fold.

See below…

Now, you will cut out your rectangles.

Again, make sure you do not cut through the left hand side.

Tip:  The thickness of your cut rectangles determines how delicate your final spider web shall be.  Remember, thicker cuts equal less paper, and therefore more delicate spider webs.  You’ll see.

Let’s keep going…

So, after you have cut out all four rectangles. Make a tiny snip at the bottom.

The final bottom snip creates the center of your spider web.  The larger the snip, the larger the center opening of your finished spider web.

Next, open up your spider web…

It’s okay if it isn’t perfect because the paint and glitter will fix it all :)

YAY!  A spider web.  Woo hoo!  Are you dancing in your chair?

You better be, or elssssssse…

Oops, that’s my witchie self peeking out there ;)

You can use any paper you’d like.  I used printer paper for ease of cutting, but feel free to try this with any paper.  Scrapbook paper works beautifully too.  Especially a dark-distressed vintagey scrapbook paper.

Before we try painting these, let’s try the trickier cutting technique, okay?

The trickier cutting technique creates all sorts of wild paper-cuts.

Here’s an example.

See what I mean?

Below we will try the “spookified snowflake” technique.

Again, I am using a piece of white printer paper.

To begin, fold the right bottom corner upwards to create a triangle…

Now, cut off the long rectangular strip at the top, to form a true triangle.

Then, take your triangle, and fold it in half again.  To form a smaller triangle.

Holding your smaller triangle upside down, fold the right side into the center.

Then, fold the left side to the back, so that all edges line up…

Coming together, to form a ”V” shape.

Your folded paper should look like this.

The next step is to cut off the paper tops, and create a true “V” shape.

The first thing we must do is draw our cutting guide lines.

First draw a line with a peek, like I have done below…

Then, go ahead and make your first cut.

The next thing we will do is draw a line in the center, with down swooping lines on either side.

The most important thing to remember with this type of snowflake/spider web is that your center line marks your cutting stop point.

You must not cut through your center line.

Below is an example of how I cut up to the center line, but not through it.

Make a snip at the bottom, to create your center opening.  Then, open up your cutting, to see what you made.

That’s the funnest part ;)

Try another one…

Invent your own cuts, but follow the rule of not cutting through the center.

Oooo, spooky star-web….

Okay, I am ready to paint and glitter!

I tested two kinds of spray paints.  A matte Master craft spray paint, and an everyday multi-use gold spray paint that we had in the workshop.  They both work great.

Make sure you do the spray painting outside, in a super well ventilated area.

I took a few glitter choices outside with me, because I simply sprinkle my glitter on the wet paint…

I tried a gold spray paint first.  I was super pleased.  Then I sprinkled a funky gold-multi fairy sparkle on it…

I then painted a few traditional black spider webs, and sprinkled some black fairy dust on them while the paint was still wet.

Then I stepped outside of the proverbial box…

I painted one of my star-snowflake-webs in black, and then sprayed some olive green in the center.  I sprinkled gold glitter on the green, and I really liked it.

Now I have a whole collection of spookylicious hanging treats.

And all virtually free, and fun to make.

How can you go wrong?

I am going to try the same spray paint technique with snowflakes during the holidays.

I am hooked.

(The photos don’t show how sparkly these are in person)

Off I go to make more…..

Have a super magical Halloween!!

Green Halloween® is a nationwide non-profit initiative started by mother-daughter team Corey Colwell-Lipson and Lynn Colwell. In 2010, Green Halloween became a program of EcoMom® Alliance and has events in cities across the U.S.

Take part in The Green Halloween Pledge!

Thursday, October 21st, 2010

We want to have a HUGE shout-out to HolidayLEDs since they are helping us promote a greener Halloween this year and “help people commit to reducing the environmental impact of their Halloween celebration” by holding a contest called the Green Halloween Pledge! All they ask is for people who are planning to commit to the Green Halloween Pledge to do at least 5 actions from the following list:

  1. Swap costumes with someone rather than buying a new costume. This is a great idea and one of our favorite Green Halloween Tips.
  2. Purchase your costume, or its components from your local thrift shop.
  3. Use LED Halloween lights to decorate instead of incandescents.
  4. Collect candy in a reusable container rather than a disposable bag. Or better yet, make a fun project for your kids by having them make their own Halloween bag out of reusable or recyclable items you have around the house.
  5. When trick-or-treating, walk, instead of driving door to door.
  6. Carry a shakable or hand-crank LED flash light instead of one that is battery powered.
  7. Make your own Halloween face paints.
  8. Give away one piece of candy instead of handfuls.
  9. Purchase an organic pumpkin.
  10. Buy your pumpkin from a local farmer.
  11. Purchase an edible variety of pumpkin and paint, instead of carving the pumpkin. Then bake and eat the pumpkin when Halloween is done.
  12. Roast & eat your pumpkin seeds instead of tossing them.
  13. Use 100% beeswax or soy candles in your jack-o-lantern instead of paraffin candles.
  14. Give away healthier alternatives to conventional candy.
  15. Compost your leftover candy.
  16. Donate your leftover candy to troops overseas.
  17. Compost your pumpkin.
  18. Make crafts out of candy wrappers.
  19. Pack décor away carefully so that it can be reused next year.
  20. Text “Boo 5” to 27138 to donate $5 to support the Green Halloween® initiative.

Participants of the Green Halloween Pledge will be automatically entered in a random drawing. One lucky participant will win a $150 gift certificate redeemable at HolidayLEDs.

So what are you waiting for? If you haven’t taken the Green Halloween Pledge yet, do so now! Visit HolidayLEDs’ Green Halloween Pledge page for details and step-by-step instructions for entering the drawing!

Everyone here at Green Halloween is immensely grateful for HolidayLEDs for holding this contest and we’re so glad we were able to inspire others to be more conscious of environmental waste during holidays.

SPECIAL NOTE: Just in time for Halloween! Save 15% on LED Halloween lights at HolidayLEDs.com with coupon code GHWEEN15 now through October 31st.

Green Halloween® is a nationwide non-profit initiative started by mother-daughter team Corey Colwell-Lipson and Lynn Colwell. In 2010, Green Halloween became a program of EcoMom® Alliance and has events in cities across the U.S.

National Costume Swap Day: One Mom’s Story

Tuesday, October 19th, 2010

Guest post by: Jennifer Crawford, Founder & Owner at Gaia’s World Fun Center (www.gaiasworldfuncenter.com) and host of a National Costume Swap Day event in Federal Way, WA

I found Green Halloween® on my own journey with Gaia’s World (a seed company working to build the first Eco-friendly children’s play center in our region).

When I learned of Corey and Lynn’s concept for a costume swap, I believed this was an awesome project that followed the Gaia philosophy of reducing waste, reusing and recycling items to improve wellness and our impact on the environment.  So I JUMPED at the opportunity to help in the National Costume Swap Day campaign.

With Green Halloween promoting the event nationally, all I had to do was register my own swap, find a location, and then tell lots of people about it.  I found the Federal Way Farmer’s Market was a perfect spot at The Commons Mall, and the owners of the market graciously donated booth space for our swap.

I was so excited about the concept I made fliers and handed out at networking events, elementary schools (after getting permission), anywhere that would take them.  I also posted on all my social media outlets, advertised in our community paper and calendars, notified local PTA’s, Girl Scout troops, and other organizations.

The day of the swap came and despite the weather, we had a great time and a great response.  Most families found this program beneficial financially and loved the ‘green’ education that complimented the swap.  My troop helped with our booth signs and made a board showing all the healthier choices parents can use to promote a greener Halloween.  We had crafts and handed out treats for every swap, and the joy on children’s faces to see their next ‘character’ they will portray this year was simply priceless.

People were so excited about this event I was asked for an encore the next two weekends.  I plan on meeting that demand and doing the same thing next year since this was such a success.  Even my own children, who helped at the booth, couldn’t make up their mind what they wanted to be this Halloween when they saw all the options they had. My daughter swapped her costume four times and my son twice as their imaginations lead their choices.

My only recommendation to others interested in hosting a swap would be to make sure if you can get help to get the word out, do so.  I was able to do much of this alone, yet I still needed others to share and spread the benefit of this event.  I can only imagine how much more we could have done for the families in our community if I was able to reach farther and truly saturate our area.  It does take time and some money to make fliers, the boards, and coordinate games or crafts, but if you are creative to find a means to do this without expense to yourself, the better.

As for Gaia’s World, we hope to continue to partner with Green Halloween in the future as we both believe our children can “Grow Green through Laughter, Knowledge, and Play.” :-)

Green Halloween® is a nationwide non-profit initiative started by mother-daughter team Corey Colwell-Lipson and Lynn Colwell. In 2010, Green Halloween became a program of EcoMom® Alliance and has events in cities across the U.S.

7 Healthy Halloween Foods That Are FUN To Eat

Saturday, October 16th, 2010

Family Fun magazine’s ideas for {healthy} Halloween fare are sure to be a hit with little ghouls and boys.

These dishes also double as edible dECOr, saving resources and money.

Invite kids to get crafty during your Halloween party – and you’ve just added an edible “activity” as well.

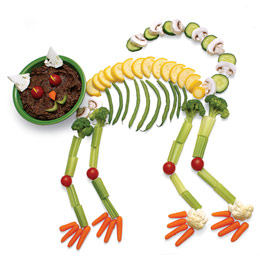
Meow! Use veggies and bean dip to make Black Bean Cat Crudités.

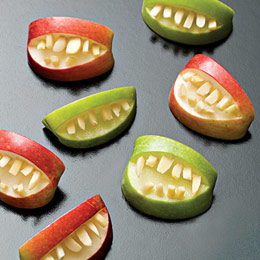
Ghastly grins! Apples and almonds are all that’s required for these “Apple Bites.” You could also fill “mouths” with nut butter and make the “teeth” out of all-natural white chocolate chips.

Finger food! “Carrot Fingers” reach out of veggie dip. Ew… Yum.

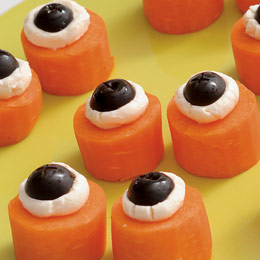
Eat your eyeballs – er, veggies! With “Edible Eyeballs” you can do both (and of course, munching on carrots is good for your kids’ peepers!)

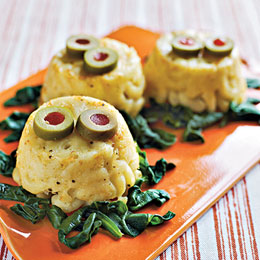
Marvelous monsters! “Swamp Creatures” are made with scoops of mac & cheese, but you can also make with potato salad, quinoa salad or any other “salad” that holds together well. Swamp sludge can be made with spinach, kale, collards or a combo sauteed greens. A great dish to serve to filler-er-up before trick-or-treating.

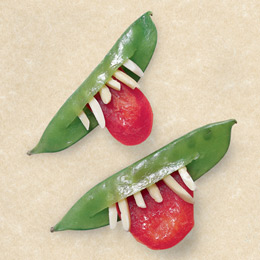
Stick our your tongue! Simple but fun, these “Goblin Grins” are sure to cause smiles all around.

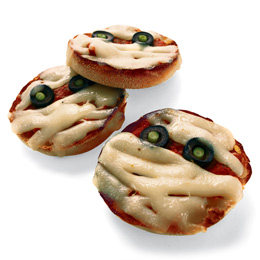
Yummy Mummies! These cute little “Pizza Mummies” Are a great main dish. Use English muffins or bagels (also available in gluten free!)

TIP: Always choose local & organic ingredients, whenever possible. However, if you want to know which foods carry the heaviest pesticide loads (many are on this list) and which are safer to buy conventionally grown, click to find “The Dirty Dozen” and “The Clean Fifteen.”

For more even more healthy Halloween food ideas, click here. And for Family Fun’s top craft ideas, click here and here.

Guest Post: Go Go Green Halloween!

Tuesday, October 12th, 2010

Guest Post by Jonathan Collins. Jonathan is the grown-ups community manager for www.minimonos.com, a virtual world for kids, focused on sustainability, generosity, community and fun!

We love Green Halloween®. Love the engagement. Love putting the eek! into being eco-friendly. And love building healthier, planet-friendly communities by mainstreaming green thinking.

Our connection with Green Halloween came about after one of the kids on MiniMonos (a virtual world for kids) wrote a blog telling us about making a recycled costume as part of a school wearable art project.

Using discarded felt-tip pens and other found objects she created a truly fantastic costume  and learned a lot in the process.

Then another of our MiniMonos kids posted a photo of a robot he’d made from recycled materials. Very cool stuff.

These kids showed such initiative, and got great feedback from other kids on MiniMonos we were inspired! We wanted to follow up and build on the idea. So this Halloween we’re holding a huge Green Halloween costume competition on MiniMonos. There’s already a buzz of excitement about it.

In our Green Halloween® costume competition kids are encouraged to get creative, use swapped costumes or create their own recycled masterpieces. They can then post photos of their Green Halloween costumes online and there are some wicked prizes up for grabs for the best of them.

Makes good sense on so many levels. Once we’d tuned in to GreenHalloween.org and discovered that $6 billion is spent on Halloween costumes, candy & accessories each year (most of which is either unhealthy or made from unsustainable materials and winds up in landfills afterwards) we wanted to do our bit to help green up the spooky season.

Not only is it better for the planet, it’s loads more fun making your own costumes anyway! We’re using Halloween as an opportunity to think again, and to get creative.

I can’t wait to see the photos that come in. Go Go Green Halloween!

Green Halloween® is a nationwide non-profit initiative started by mother-daughter team Corey Colwell-Lipson and Lynn Colwell. In 2010, Green Halloween became a program of EcoMom® Alliance and has events in cities across the U.S.